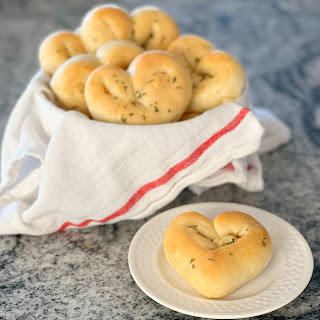
Heart Shaped Dinner Rolls
from Somewhat Simple
Ingredients
1 1/2 cups hot water
1 tablespoon active dry yeast
2 tablespoon sugar
2 tablespoons vegetable oil
1 teaspoon salt
3 1/2 - 4 cups flour
butter, for brushing, if desired
Instructions
For the dough -
In the bowl of a stand mixer, mix together the water, yeast, and sugar. Let stand for 5 minutes, or until frothy.
Add the oil, salt, and 2 cups of flour. Mix until well combined.
Add the remaining flour 1/2 cup at a time. You want your dough to be slightly sticky, but pull away from the sides of the bowl. Do not add too much flour!
Knead for 3-5 minutes, then cover and let rise until doubled in size, about 30-45 minutes.
Gently punch down the dough, then place it on a lightly floured surface,
Preheat the oven to 375 and spray a baking sheet with cooking spray.
To form the hearts -
Pull off about two ounces of dough and set aside. Two ounces is about as much dough as what would fit in an ice cream scoop. Continue pulling off 2 ounces of dough at a time until you've separated all of the dough into individual piles.
On your floured surface, roll out each of the little balls of dough with the tips of your fingers into a rod-shape until they are 4 inches long. You may need to use both hands to roll out the dough.
With a sharp knife, cut down the center of the dough, leaving about 1/2 inch at the end still attached. This will create a V shape in the piece of dough.
Fold one end of the V down into the center of the roll. Then you'll do the same thing on the other end of the roll of dough in order to create a heart shape. If you need to, lightly press the sides of the heart-shaped roll in to get the correct shape.

Place your rolls on a prepared baking sheet to allow them to proof. When proofing bread, I like to spray plastic wrap with a little olive oil and lightly place it (oil side down) over the rolls. This helps keeps the moisture in and is super easy to remove once the rolls are ready to go in the oven.
Finally, bake your rolls for 13-15 minutes or until golden brown.
Brush them with melted butter, if desired, and serve warm.
Finally, bake your rolls for 13-15 minutes or until golden brown.
Brush them with melted butter, if desired, and serve warm.
Notes:
To help dough rise faster, place the dough in the oven on the Proof setting, or heat up oven to 180 degrees then turn oven off before placing the dough inside.
Rolls are also delicious sprinkled with Seasoned Salt, Garlic Powder, and Dried Parsley!
Comments